Laptops are essential items of every household. It has become a necessity and no longer a luxury. However, a laptop without an internet connection is of no use. With the options of video streaming, smart home devices, and online gaming platforms it is important to have a strong internet connection. The Internet opens up a world of prospects for you.
You can apply to jobs, study online, make online transactions, be socially active and even attend school. Therefore, you see, apart from entertainment, the internet has a bigger role to play. You get to do everything just with a click on the mouse.
When you are getting your work done on your laptop and you suddenly realize that your internet connection isn’t working, it becomes annoying. Today, we are going to discuss some of the issues that cause internet failure and how you can resolve them.
Quick troubleshooting tips that you can try while internet failure
There are many failure points and therefore, understanding the exact reason for the failure can be a tedious task, but this is the most crucial aspect in the process. When you know what went wrong, you would be able to resolve it with ease. Here are few quick tips that can help you.
1. Restart your laptop

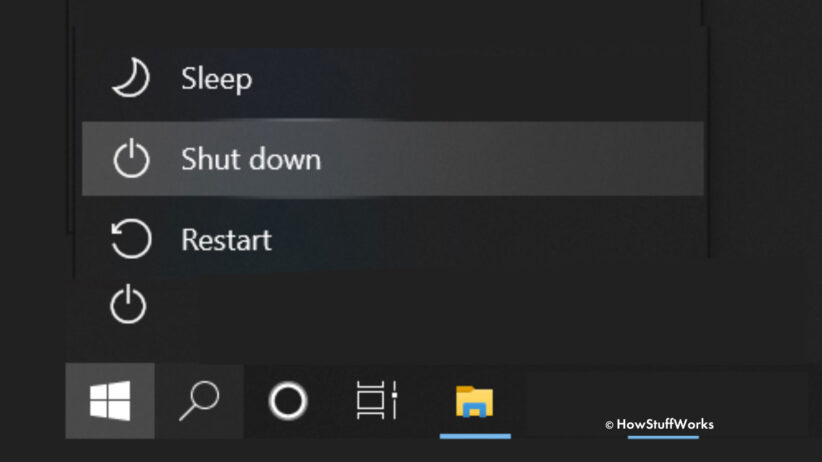
If you are not able to trace the actual issue, you can restart your laptop. This is the basic thing that anyone can do. It is one of the easiest hacks that can solve multiple issues. It resets all the bad settings that might be causing a hindrance to your internet connectivity. The steps are as follows:
- Go to the start icon and select – power> restart. Your laptop would restart automatically.
- After restarting your laptop, you should restart your modem.
- You can restart your modem by unplugging it from the power sources.
- After this, wait for few seconds and plug it back in again.
- Do a soft reset after this by opening your router’s home page.
- Next, click on the reset butting under “advanced setting” and reset it. This will clear caches and refresh them.
2. Restart your router manually
Before, you give on your router and take it to an ISP store for replacement or repair; you should once try to restart the router. Some of the ISPs provide low-quality hardware and it starts to malfunction after operating for a long time. This affects the external as well as an internal network of internet connection. You can restart your ISP router by following the below-mentioned points:
- Go to the back of the ISP and disconnect the power cord.
- Now, wait for around 60 seconds because it will take some time for the ISPs to timeout.
- After the wait time is over, plug the power cord into the back of the router.
- Have a closer look at the lights and you would able to see the connection light blinking for some time before turning to solid.
- Once all the lights lit up, you can test the internet connection on your laptop.
3. Clear your DNS cache
Many times, you would be able to solve internet issues by clearing your DNS cache. The DNS cache is a digital history of the websites that you have visited in the past. You can even reload these web pages easily. If there is an anomaly in the storage bank, your cache can build up technical issues. Here are some of the ways you can clear your cache on different laptops:
Windows
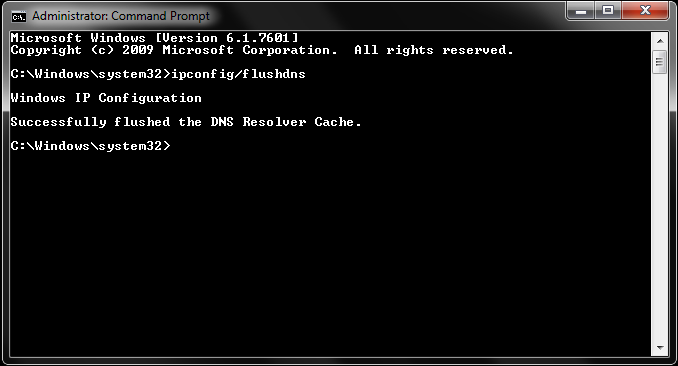
- Go to the search bar and write cmd, it will take you to the command prompt.
- You can also find the command prompt in the folder of Windows System.
- When you reach Command Prompt, you need to type “pconfig /flushdns” and click on “enter”.
- When the cache is cleared, you will be notified by a sound.

Mac
- For Mac laptops, you need to run the Terminal app in the Utilities folder or search for it on Spotlight.
- The commands that you can use to clear your cache are – Yosemite and after; Yosemite 10.10–10.10.3; Mavericks, Mountain Lion, Lion; or Snow Leopard.
- You will be asked for the administrator password before your cache finally flushes out.
4. Reset the network settings
If none of the above tips work, you can reset the entire network. When you reset your network setting, it moves back everything to its default settings. It will help to erase all the Wi-Fi bugs and allow you to start from scratch. When you restore your network completely, it will wipe out the current setting and it would be like new. Your laptop would not remember the Wi-Fi’s VPN settings, username, or passwords. The steps to resent network settings are as follows:
For Windows
- Click on settings> Network and internet> status. Then, click on the “reset” button.
- Next, click on “reset now” and it will confirm your action. Click on “yes” to reconfirm.
- Once this is done, it is advisable to restart your laptop and use the Windows guide to set up the home network again.
For Mac
- If you have a Mac laptop, you should click on the Apple menu? System preferences> network.
- On the left side of the screen, click on “Wi-Fi” from the drop-down menu and click on the “minus” button.
- Next, click on the “plus” button and select the interface options of the Wi-Fi. Click on “apply” and close the settings menu.
It becomes tremendously frustrating when you are not able to access the internet. With the troubleshooting tips mentioned here, you have the power to fix the issues at your end. There are various things you can do to troubleshoot the network issues and hence, there is no need to tolerate any kind of problems or lagging while accessing the internet on your laptop. Whenever your internet is working but being slower than expected, run a speed test so that you know if the issue is at the provider’s end.
Contents
