If your Windows-based device is unable to receive any further signals from the network, the limited Wi-Fi issue crops up. When this message is displayed on the screen, you must know that neither the internet nor any other source of a network can be accessed, unless the issue is solved. This problem can occur both in wireless and wired connections. There are a few things that you must check and do to solve this issue. We have mentioned the steps in detail later in this post. As of now, go through the things that you must check to ensure whether or not connectivity issues are caused by limited WiFi.
If you have a wired network connection, check the following things:
1. Check your hardware connection
Check whether the cable is broken. If you use a modem, router, etc. Ensure that the switch is on. Sometimes simply restarting the modem or the router solves the issue.
Try doing that. You can also consider connecting your Ethernet cable to another part of the router to see if it works. If you notice the power led on your Linksys router is blinking, it probably indicates a corrupted firmware. Address this issue and your job would be done.
2. Ensure that your adapter is working properly
Disable and then enable your network adaptor to make sure that it’s functioning well. Also, check if the settings of the device allow it to obtain an IP address automatically. See if the IP address coincides with another device.
Verify that your computer has got a unique IP address. IP address conflicts occur when two computers on the same network share the same IP address. Resolve if that’s the case here.
If you have a wireless network connection, check the following things:
3. Incorrect wireless key/password
To connect to a secured wireless network, you need to provide the security key or passphrase. A limited Wi-Fi issue crops up when you have changed the settings of the device beforehand. If you are unable to connect, check the wireless security settings of your router.
4. Wireless MAC Filter enabled on the router
Usually, Linksys routers have a wireless Mac filter feature. This automatically restricts the number of wireless clients that the network would allow to connect.
5. Ensure that your adapter is working properly
Any wireless adapter would perform effectively when the device’s drivers are updated. Wireless adapter’s compatibility with wireless N, AC, G, A, and B standards must also be considered. Make sure you know everything about your wireless adapter. Look for connectivity of other devices within that network. If all the devices connected to that network have good connectivity, the router is expected to work fine.
6. Distance from the router
Distance affects the stability of the network connection. If there’s any interference from neighbouring wireless devices, such as microwave ovens or phones, oftentimes, connectivity issues crop up. If these issues occur, we recommend changing the channel of your router.
7. Outdated router firmware
If you haven’t updated your firmware for quite some time, chances are that you might experience firmware bug issues. To solve this, you must update your firmware. However, note that doing so might require resetting the settings to factory default. So, prefer to save the advanced router settings somewhere so that you can make the changes again.
Methods that can help you solve the limited Wi-Fi problem in Windows 10 and 11
Limited Wi-Fi access is one of the most irritating and frustrating problems that anyone can come across. To help our users, we have enlisted some effective methods that are sure to help you solve this issue. You can follow them while sitting at home. Read on to know how you can do so.
Method 1: By Resetting Wireless Adapter Power Settings
This is the first method that you can try out. Try changing the power settings of the wireless adapter. If you are wondering how to do that, follow the steps mentioned below:
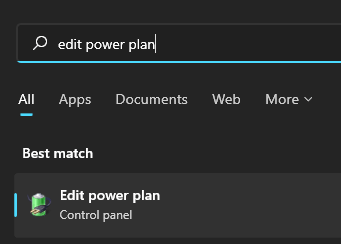
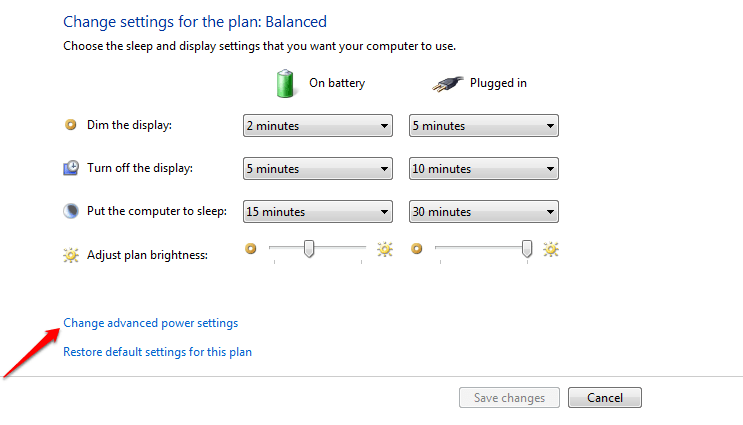
- Step 1 – look for the edit power plan in the Windows search bar.
- Step 2 – once you get that, click on edit power plan.
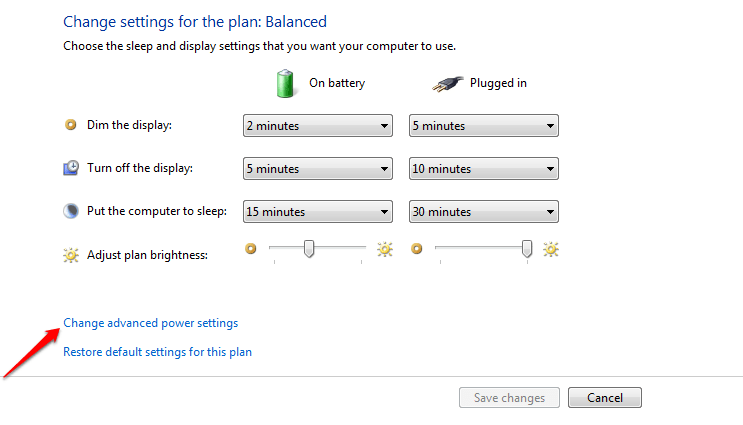
- Step 3 – now, go to Change advanced power settings.
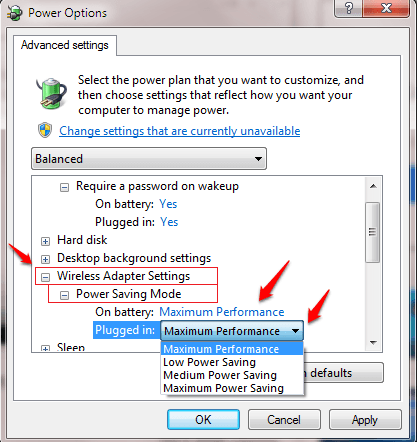
Now, a list of power options appears on the screen. Scroll down, unless you get the entry named wires adapter settings to expand it.
Now click ok next to expand the power saving mode entry.
Method 2 – By Resetting the IP Address Using CMD
The second method is to try changing the IP address using the command prompt. For that, launch the command prompt in administrator mode.
If you don’t know how to do that,
- Type cmd in the search box.
- When the command prompt appears in the list of search results, right-click there.
- Now click on the Run as an administrator option.
Now follow the following steps:
Input these three commands to solve your issue:
- · netsh int tcp set global rss=enabled
- · netsh int TCP set heuristics disabled
- · netsh int tcp set global autotuninglevel=disabled
These commands are aimed at resetting the IP / TCP autotuning. It’s expected to solve the issue of limited wifi access on Windows 10 and 11 devices.
If you are still facing the same issue, even after IP auto-tuning, get in touch with your internet service provider and get the best solution for this issue.
Method 3 – By Changing Power Management Option
Follow the below-mentioned steps for this method:
- Step 1: search device manager in Windows taskbar
- Step 2: when the device manager comes up on the screen, click on it to open it.
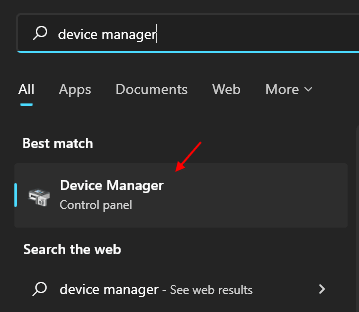
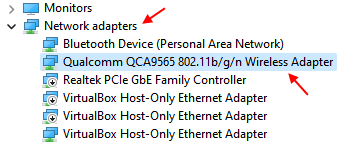
- Step 3: now, double click on the network adapter to get a detailed list.
- Step 4: scroll down and when you spot the WiFi driver, double click on that.
- Step 5: now, click on the power management tab.
- Step 6: there will be an option to uncheck. You will get a message saying “allow the computer to turn off the device to save power”. Uncheck this option.
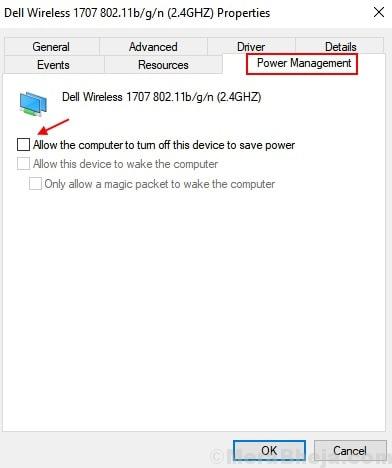
- Step 7: once unchecked, click on ok and exit.
Method 4 – By the Reinstallation of WiFi Driver
Follow the following steps for this method:
- Step 1: Press the Windows key on your keyboard.
- Step 2: search for the device manager in the search box.
- Step 3: when the device manager appears in the search results, click on that.
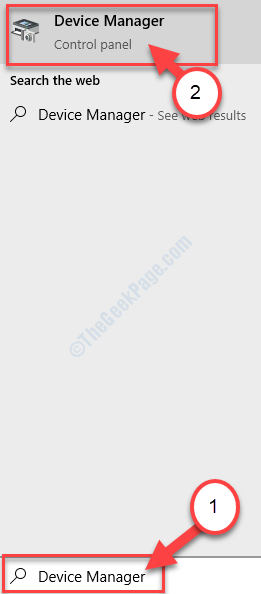
- Step 4: in the device manager utility window, click on the network adapter option, to expand it.
- Step 5: there will be an option Wi-Fi driver.
Right-click on that and click on uninstall the device.
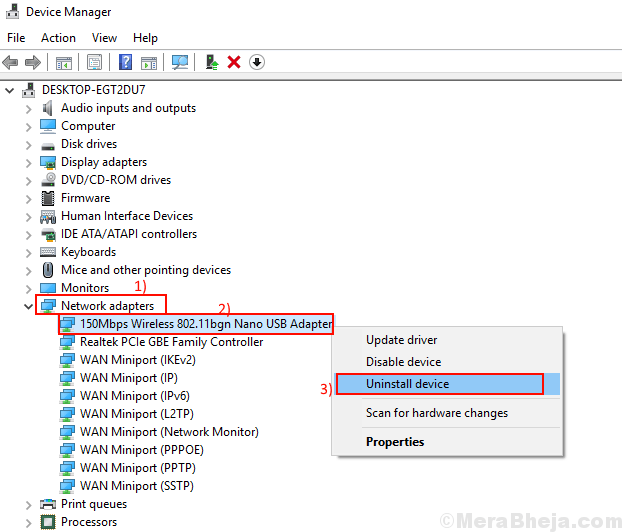
The driver will get uninstalled.
- Step 6: Restart the computer now.
Method 5 – By Updating Driver
Follow the steps mentioned below for this procedure:
- Step 1: search for the device manager in the taskbar of your device.
- Step 2: Click on device manager. The device manager utility window opens.
- Step 3: click on the network adapter to get a drop-down list.
- Step 4: Select the wifi driver option, right-click on that and choose update.
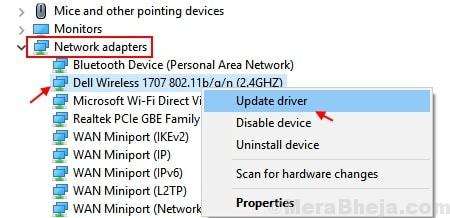
- Step 5: now, click on search automatically for drivers.
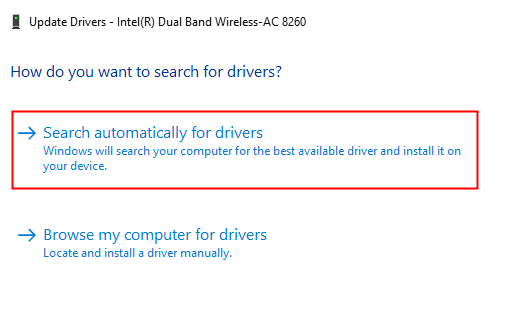
Allow the device to update the Driver automatically. ]
Conclusion
We have listed above the most useful and effective steps that can help you to solve this issue at home. This problem can arise out of nowhere. It’s challenging to find the ideal solution for this problem. However, if you have tried all the 5 methods mentioned above, and still facing the same issue probably it’s time to contact your network service provider or take your device to professionals.
Contents
