With the ever-increasing use of the internet and sophisticated digital technologies, network problems have increased manifold. One such problem seems to be the DNS server.
DNS stands for Domain Name System. The role of a DNS server is to translate the name of the domain you want to visit into the IP addresses that match that domain name.
For instance, your home network depends on a DNS server provided to you by your internet service provider. If you change the DNS server on your router, all the devices in your network will be able to use it. When your browser sends the server any domain name, the server runs a complex interaction with many other servers to provide you the corresponding verified IP addresses. In case the domain is something you use frequently, the DNS stores the information in its cache files for easy access.
As you can see that your DNS server is highly important for all your internet activities, any problem within your system can have a drastic effect on it. However, an essential thing to note here is it is pretty tricky to change the DNS settings but very beneficial.
By switching the DNS server on your router, you can configure parental control settings on the OpenDNS site, restrict multiple types of internet websites, and monitor those which you have viewed via your home network.
Xfinity Router Connections
If you want to use Xfinity Wi-Fi connections, you can add up to ten devices to your network. The Xfinity Wireless Gateway integrates the modem and router technologies in one unit and creates the quickest and most trusted Wi-Fi at home. Based on your location and service requirements, you will obtain an Xfinity Gateway or Xfinity Advanced Gateway.
While you cannot connect to xFi with customer-specific devices, you can benefit from the latest DOCSIS 3.1 Modems.
How to change Xfinity Router DNS Settings?
The key to change the Xfinity Router DNS Settings is that you don’t always need to use the same DNS server provided by your ISP to access various internet activities. This is because the private DNS servers ought to have an increased level of performance and faster services for customers. The Xfinity DNS, which controls the internet access for users, has indeed failed over time. Likewise, the efficiency will be degraded when you’re using the ISP’s commercial DNS.
That is why customers choose private DNS like Google’s Public DNS and OpenDNS. Other premium options, like improved service and free assistance, are offered by OpenDNS. You can easily sign up for OpenDNS basic version.
How to change the Xfinity router DNS settings on Mac OS?
For those on Mac devices, if you want to change the Xfinity router DNS settings, follow the steps mentioned below:
- Access the Apple menu on your Mac device.
- Choose the system preferences and tap on the network option you see on the screen
- After this, a new window will be open where you can see a lock icon on the bottom of the window. Tap on it.
- With this, you will be asked to enter the authentication password.
- Finally, select the connection
If you wish to change the Ethernet connection configuration, apply the below steps:
- Go to your Mac device’s built-in Ethernet.
- Then look for the advanced option.
Moreover, to change the wireless connection, follow the given steps:
- Check the Airport tab on your Mac device.
- On the next window that appears click on the advanced settings.
- Then, choose the DNS menu to change the settings.
- Next, you have to tap on the ‘plus icon’ in order to add a new IP address for Xfinity router.
- After this, click on the apply button and then click on ‘OK.’
How to change the Xfinity router DNS settings in Windows 7?
On your Windows 7, if you have to change the current Xfinity router DNS settings, follow the steps mentioned below:
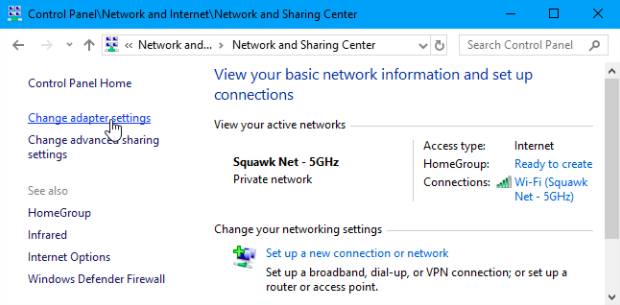
- Firstly, you have to open the control panel on your device.
- Then, go to Network and Internet section.
- Next, you have to check for the Network and Sharing Center.
- Now, click to change the adapter settings.
- After that, select the internet connection from the options displayed.
- Lastly, configure the Google Public DNS settings.

Furthermore, you have to choose some different settings options for Ethernet connection. Here are the steps to access to the Ethernet connection:
- Go to the control panel on your device.
- Navigate to the network settings.
- Then, right-click the local area connection option.
- With this, move on to the properties to change or modify the other Ethernet connection options you wish to alter.
Also, if you have to modify some advanced wireless connection settings, you have to follow the following steps:
- Go to the start menu and then settings of your device.
- After this, Right-click on the Wireless Network Connection option.
- Next, tap on the properties menu.
- You can add the password and confirm it if you wish to add confirmation.
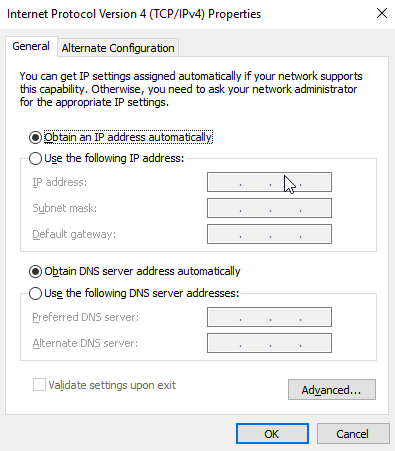
- Then, navigate to the Network tab back and then choose the internet protocol version 4.
- After that, you have to open the properties window again and tap on the advanced button.
- On the next window, you need to scroll down to locate the DNS tab.
- Here, you can enter the IP addresses you have to remove that you don’t need anymore. With this, tap on the OK button you see on the bottom of the screen.
- Once you remove all the available IP addresses, enter the Xfinity router IP address.

Once you change the DNS server on your Windows 7, you may be required to clear your DNS cache to make sure that windows are not using any records from the previous DNS server.
How to change the Xfinity router DNS settings in Linux?
You can change the DNS settings from ‘Network Manager’ to enjoy running a Linux operating system on your PC. Read and follow the steps given below:
- First, you have to go to the system menu of your Linux-based device.
- Then, move on to the preferences section.
- After that, open the network connections option.
- Select your desired connection from the available connections list that appears on your screen.
- Now, go to the properties and then wireless connection.
- Click on the edit button to edit, change or modify the connection.
- After this step, choose the Internet Protocol Version4 settings.
- Next, navigate to the DNS servers’ field and add the Xfinity router address here.
- With this, you may be required to set a password for confirmation and then click on the confirm button.
FAQs
Are Xfinity routers good?
Xfinity routers are quite popular among users. They are efficient enough to get the job done. High-end routers from Xfinity are equipped with advanced features such as MU-MIMO and beamforming. The presence of these features can significantly improve the router’s performance and range. Not just that, but it will also speed up the internet connection.
Is it safe to change the DNS settings of your router?
First of all, DNS settings are certain records within the Domain Name System. It allows users to access their emails and websites through their unique domain names. Changing your current DNS settings is considered safe. In other words, it doesn’t bring any harm to your device.
Is DNS necessary?
No, DNS is not exactly necessary. You don’t need a DNS server to access the Internet. In case, your DNS is not working properly, you won’t be able to hook to PCs or other devices on the internet. However, you can still connect to the internet using the IP addresses of the device. It should be noted that upgrading your DNS server can provide you with more security and faster speed. This is because it is an important part of your internet communications.
Wrapping up
Ultimately, using the Xfinity routers is an appropriate decision as it protects and secures your data. This is mainly because it’s not possible to protect the ISP DNS server. They can also view your previous search history in the same way.
So, you can change your Xfinity router DNS settings by following some easy steps, as mentioned above. Some of the popular and best Xfinity compatible modems are Motorola MB7621, NETGEAR CM500, ARRIS SURFboard SB8200, and NETGEAR Nighthawk C7000.
Contents
